Celery 是一个 Python 框架,用来管理分布式任务的,遵循面向对象的中间件方法。它的主要 feature 是可以将许多小任务分布到一个大型的计算集群中,最后将任务的结果收集起来,组成整体的解决方案。
要使用 Celery,我们需要下面几种组件:
- Celery 模块
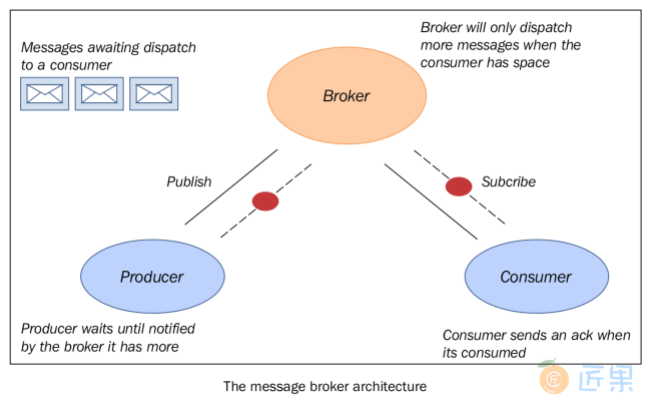
- 一个消息代理(Message Broker)。这是一个独立于 Celery 的一个中间件,用来和分布式的 worker 收发消息。它会处理在通讯网络中的信息交换。这种中间件的消息发送方案不再是点对点的,而是面向消息的方式,最终名的是发布者/订阅者的范式。
Celery 支持很多消息代理,最有名的是 RebbitMQ 和 Redis。
1. 如何做…
安装 Celery,我们需要 pip 包管理器。在命令行通过以下命令安装:
pip install celery
之后,我们必须安装消息代理。在本书中,我们使用 RabbitMQ 来做消息代理,这是一个面向消息的中间件(也叫做代理人消息),它实现了 高级消息队列协议(AMQP) 。RabbitMQ 服务端使用 Erlang 写的,基于 Open Telecom Platform(OPT) 框架来管理集群和故障转移。安装 RabbitMQ 的步骤如下:
- 下载安装 Erlang:http://www.erlang.org/download.html
- 下载并运行 RabbitMQ 安装器:http://www.rabbitmq.com/download.html
下载完成后,安装好 RabbitMQ 然后用默认配置运行即可。
最后,我们会安装 Flower( http://flower.readthedocs.org/ ),这是一个基于 Web 的任务监控和管理工具(进行中的任务,任务细节和图表、状态等)。安装方法和 Celery 一样,在命令行输入:
pip install -U flower
然后,我们可以验证一下 Celery 的安装,在命令行输入:
celery --version
会出现(译者使用的版本比原书高):
4.2.1 (windowlicker)
Celery 的用法非常简单,和显示的一样:
Usage: celery <command> [options]
显示的配置如下:
usage: celery <command> [options]
Show help screen and exit.
positional arguments:
  args
optional arguments:
  -h, --help            show this help message and exit
  --version             show program's version number and exit
Global Options:
  -A APP, --app APP
  -b BROKER, --broker BROKER
  --result-backend RESULT_BACKEND
  --loader LOADER
  --config CONFIG
  --workdir WORKDIR
  --no-color, -C
  --quiet, -q
---- -- - - ---- Commands- -------------- --- ------------
+ Main:
|    celery worker
|    celery events
|    celery beat
|    celery shell
|    celery multi
|    celery amqp
+ Remote Control:
|    celery status
|    celery inspect --help
|    celery inspect active
|    celery inspect active_queues
|    celery inspect clock
|    celery inspect conf [include_defaults=False]
|    celery inspect memdump [n_samples=10]
|    celery inspect memsample
|    celery inspect objgraph [object_type=Request] [num=200 [max_depth=10]]
|    celery inspect ping
|    celery inspect query_task [id1 [id2 [... [idN]]]]
|    celery inspect registered [attr1 [attr2 [... [attrN]]]]
|    celery inspect report
|    celery inspect reserved
|    celery inspect revoked
|    celery inspect scheduled
|    celery inspect stats
|    celery control --help
|    celery control add_consumer <queue> [exchange [type [routing_key]]]
|    celery control autoscale [max [min]]
|    celery control cancel_consumer <queue>
|    celery control disable_events
|    celery control election
|    celery control enable_events
|    celery control heartbeat
|    celery control pool_grow [N=1]
|    celery control pool_restart
|    celery control pool_shrink [N=1]
|    celery control rate_limit <task_name> <rate_limit (e.g., 5/s | 5/m | 5/h)>
|    celery control revoke [id1 [id2 [... [idN]]]]
|    celery control shutdown
|    celery control terminate <signal> [id1 [id2 [... [idN]]]]
|    celery control time_limit <task_name> <soft_secs> [hard_secs]
+ Utils:
|    celery purge
|    celery list
|    celery call
|    celery result
|    celery migrate
|    celery graph
|    celery upgrade
+ Debugging:
|    celery report
|    celery logtool
---- -- - - --------- -- - -------------- --- ------------
Type 'celery <command> --help' for help using a specific command.
2. 了解更多
有关 Celery 的更多细节,可以访问官方主页: http://www.celeryproject.org/
下一节:在本节中,我们将展示如何使用 Celery 模块创建一个任务。
